
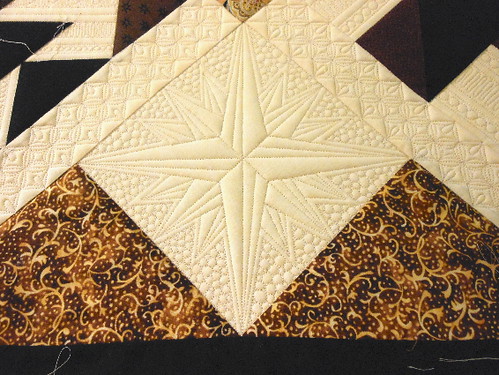
Okay - here is how I drew out my directional compass quilting block from my latest quilt. I hope this tutorial is helpful to you all and I hope you can try it out soon!

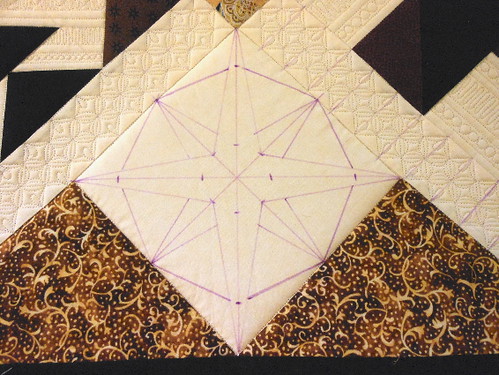
The block is a 7" square - so I will show you how to draw the guidelines according to that size. First draw a line from the top to bottom of the square, then from the left side to the right side. After you have drawn those lines - draw two more lines as shown in the picture. Use the center of the lines as a guide and draw 8 markings, 1 inch away from the center.
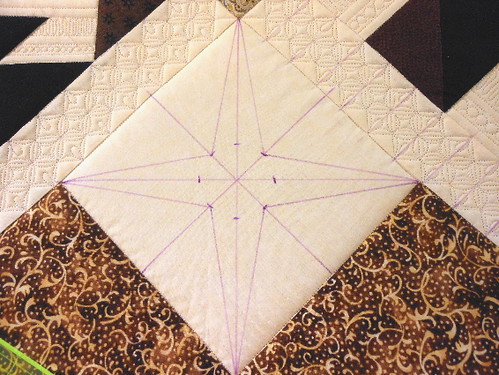
Use the markings from the center as a guide to draw 8 lines as shown above.
Use the remaining markings as a guideline for the smaller lines. See the picture below.

Half way there - I know, there is a lot of marking - but it is worth it!

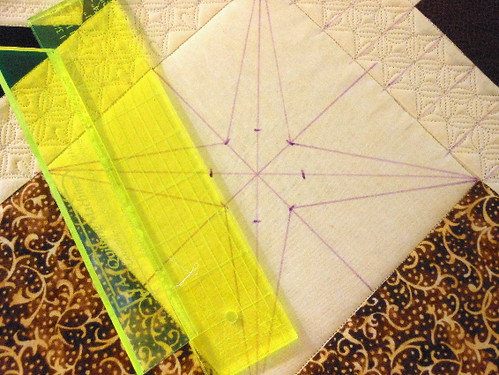
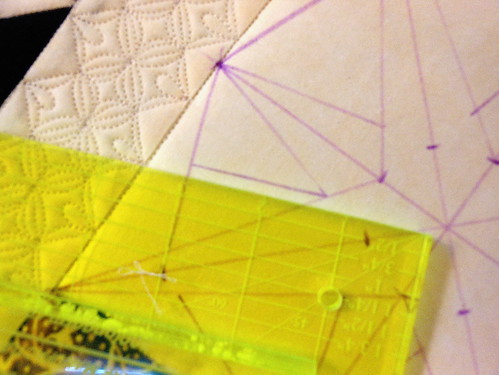
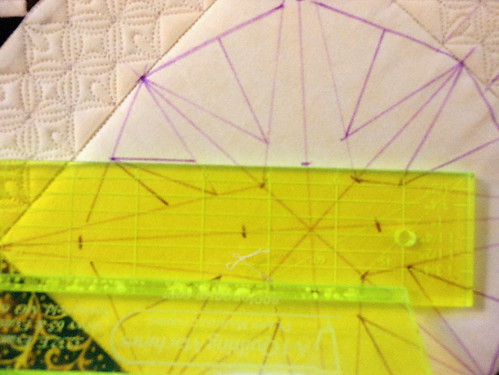
You need to mark 4 more guide markings. Take a ruler and measure 3 1/2 inches away from the center and make a mark on the four center perpendicular lines.
Now - make a line from the smaller triangle points to the markings you just made. These lines are just a guideline and will not be quilted. See the picture below.
This is how it will look.
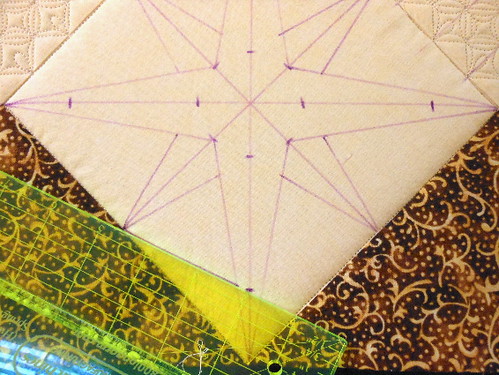
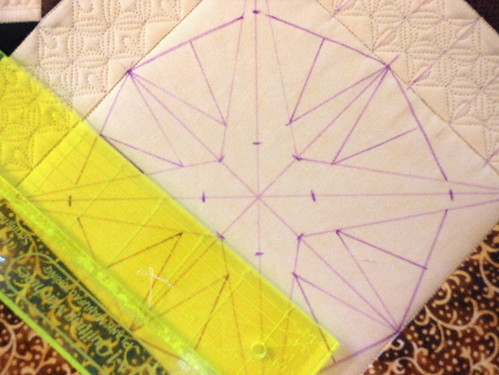
You will need to make a straight line in the center of the triangles you made from the previous step. Use your ruler to help make sure you have a straight, perpendicular line.
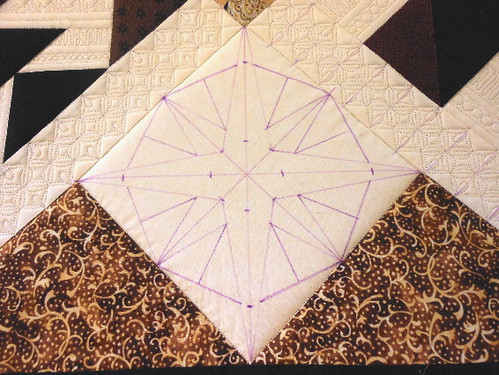
This is how it will look with all the lines drawn.
Use the first 8 markings as a guideline for the last lines to be drawn to make the shape of the directional compass.
Hopefully these pictures are helpful enough.
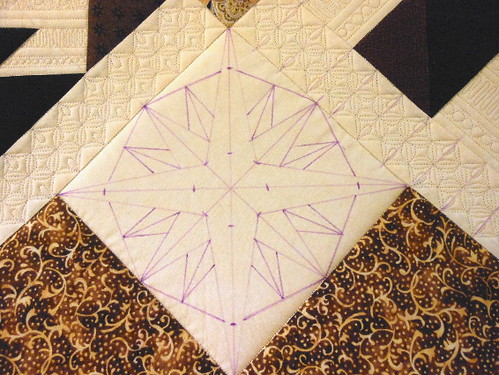
Now you have the basic shape of the compass and you are more than welcome to stop. All you more detailed quilters can continue on to the next steps.

To give the directional compass more movement I added a center line in each left triangle section going in a clockwise direction. Then I added a line about 1/8 inch away from the outside lines to create a barrier between the filler (pebbling) and the compass.
So, just quilt on the lines and use a filler if you want it to really pop!
Thank you so much for the tutorial, Judi. Being a newbie to quilting, I'm always wondering how you quilt so beautifully and cleanly. Everything you do is so gorgeous! This gives us just a little insight into your artistic process. One of these days I hope to be one-quarter of the quilter you are!
ReplyDeleteGreat tutorial Judi - I'm going to try that. Thank you.
ReplyDeleteBeautiful, just beautiful! Thanks for the tutorial.
ReplyDeleteSo lovely, thank you for showing how it is done.
ReplyDeleteIt's fantastic, thank you so much!
ReplyDeleteYou're always so generous, thanks for sharing... it's really so very beautiful
ReplyDeleteYour quilting is so awesome! I am always so blown away by your quilting. I had no idea how you quilted the block so thanks for the great tutorial. I know sometimes you use two layers of batting. Can you tell us about that in a future post? Thanks again for info that you share with us.
ReplyDeleteThat is a great share, Judi. Thanks so much for being this generous with us!
ReplyDeleteThis is so beautiful ! I wish I could do something like that too, it´s so outstanding.
ReplyDeleteElisabeth
Fabulous, great tutorial, now I know I might give it a try. thanks.
ReplyDeleteThank you for sharing. Your quilting is exquisite, and inspirational.
ReplyDeleteThank you Judi for sharing another wonderful tutorial! I love the design and can't wait to try it out on a quilt!
ReplyDeleteThank you for sharing so much, you have a wonderful talent! What do you use for marking? I'm really leery since the last time I used the blue washout marker, didn't :-(
ReplyDeleteOh judi, you make it look easy but I'm not fooled! This would be one block for me and for you it's just a small square in a big quilt! You are so amazing!!
ReplyDeleteThanks for the tutorial. Might have to try this out a future quilt. Minus the little pebbles, mine end up more like scribbles.
ReplyDeleteYour mind works wonders!! Your amazing!
ReplyDeleteThis is intense! I got about two steps in and thought, "Wow, that's beautiful but I'm totally not skilled enough to do that." Maybe someday. Until then I'll just have to keep drooling over your accomplishments.
ReplyDeleteThanks for sharing. That is wonderful! Great tutorial
ReplyDeleteThank you for your excellent description. The photos and instructions are easy to understand and follow. That had to have taken a lot of your time so thank you for your generosity!
ReplyDeleteI am just totally blown away...see me flying by???? That is so amazing. Your work is out of this world amazing.....
ReplyDeletecool, thanks!
ReplyDeletevery generous of you to share, thank you.
ReplyDeleteI will be on the outlook for a suitable quilt to try this on. And give credit where credit is due...to you :-)
Love this, thank you so much for sharing! I hope you write a book someday, I would buy it in a heartbeat.
ReplyDeleteJudi you make it look 'so easy' and yet WOW! I can't keep a straigth line to save my life! LOL!! I keep trying and I will get better! Thank you for the great tutorial!!
ReplyDeleteThank you for the tutorial I always look forward to them, you make it look so easy, I know better! I'm anxious to try it, its beautiful.
ReplyDeleteExcellent!!! Thank you so much for the tutorial....your block really pops and I love it.
ReplyDeleteSmiles,
Kelly
Judi, it looks lovely, but it sure is a lot of marking. How confident are you that the purple markers really come out? I have used them, and they seem to disappear, but if I happen to spray water on them, the color re-appears. Just curious about your experience with that. It is so beautiful. You are really brave and patient to do so much ruler work!
ReplyDeleteThanks again for sharing your talent and ideas!
Oooh I haven't been here for a while. LOVELY as ever!! : )
ReplyDelete~Monika
You are awesome. I am going to try the block tomorrow. Thanks again
ReplyDeleteSo beautiful, thank you for a great tutorial. !!!
ReplyDeleteSimply stunning!!! I'm your newest BIGGEST fan! Beautiful work is an understatement... Thank you :)
ReplyDeleteSimply stunning!!! Beautiful work is not enough of a compliment. :) PS Make it simpler to comment, I've tried several times...
ReplyDeleteThanks for a wonderful tutorial, I'm going to try this!
ReplyDeleteWhat a wonderful tutorial Judi! Can't wait to try this!
ReplyDeleteGreat tutorial - can't wait to try this out on a quilt!
ReplyDeleteThank you so much for giving us a glimpse of your design process. You are such a blessing to share your gift with the world. I have been posting pictures on my Green Fairy Board on Pinterest for quite some time. I also have your book and I am looking forward to new ones that you publish. I was searching online for a tutorial from you and that is how I found this. I want to take classes you teach and will search online craft class forums to learn from you. I aspire to quilt with an eye as keen as yours. Thank you again Judi.
ReplyDelete