
Okay - this may be something you all know how to do - but I figured I would share how I have been doing my diamond sash quilting. I want your feedback at the end of the post - are you okay with pictures, or would you rather have video? Was this something you wanted to know? Be honest - I hope I can handle it...............
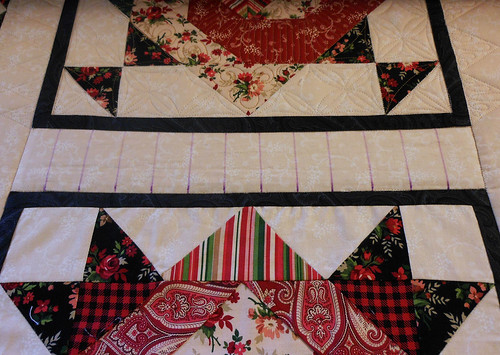
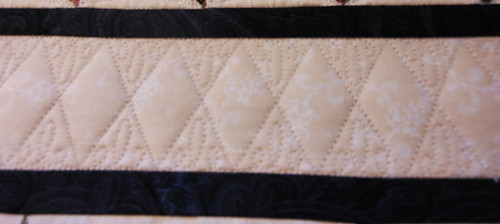
This sash is 2 x 13 inches. I want to get a diamond shape, so I draw a line at every 1 inch increment - these lines are just guidelines. I don't draw the diamond shape because it isn't necessary and that would be more work.
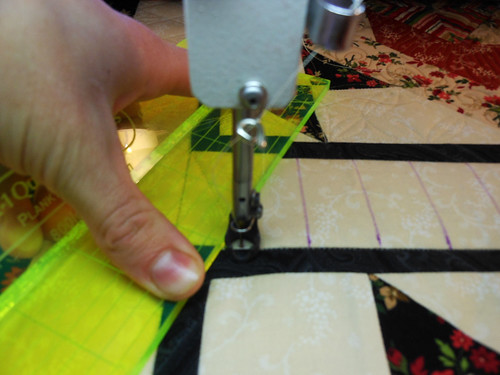
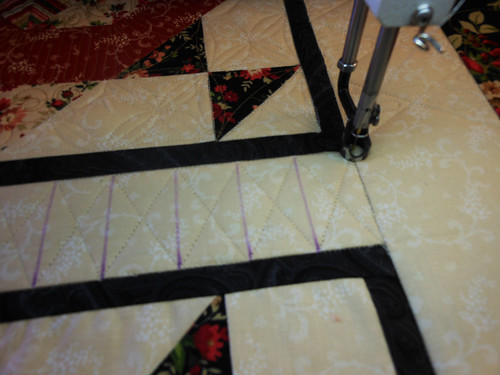
Start quilting at the top left side, going down to the bottom right line of the first section. Continue quilting up and down the sections to create up and down V's. Notice my straight edge ruler is 1/4 inch away from the line at the top of the next point - this will ensure that my lines will be accurate. ***Whenever you are working with straight lines on your quilting machine you need your flat extended base attached so that you can get a good grip on the ruler and a flat edge to work with.
If you can see my thumb - it has a little white on the tip because I press pretty hard. I don't want the ruler to move at all.
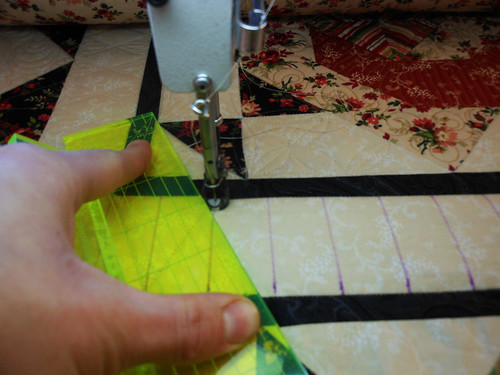
Again - notice the placement of the ruler - 1/4 inch away from the ending point.
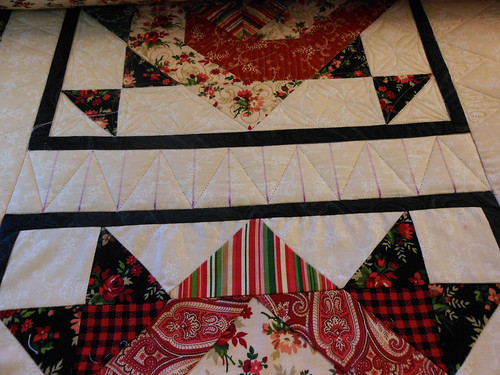
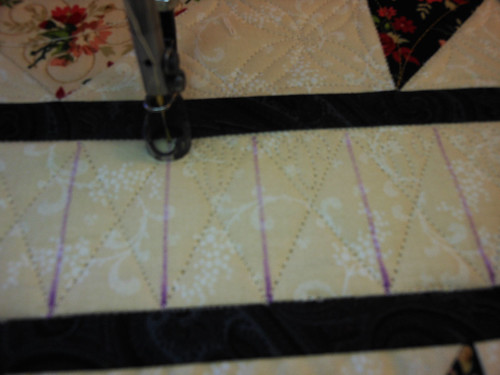
The first section is done - I quilted it left to right. The reason I don't go back right to left is because I am quilting straight lines and my machine doesn't like to go right to left for a long run - the thread shreds if I try. So, start back at the beginning and quilt the opposite sides of the lines to create and X in each section.
Leave your needle down and stay put - you can quilt right to left for the fill in loops.
The reason your machine can do right to left at this point is because you will be moving the machine up, down and over. The bobbin can keep up with that!
Fill in the triangles you made with loops - this will give dimension to your diamonds. So - three loops, small-big-small. Continue right to left, when you get to the end of the last triangle continue onto the other side. I travel along the straight edge of the sash to get to the other side.
So - there you have it - not too bad. What do you think - did you already know this and I just wasted a post - or was this helpful?
This was fantastic! Very helpful. I didn't know there's a directional difference on longarms. Your tutorial is perfectly set up, too, with terrific photos. Honestly, my Shockwave keeps crashing since it's last auto-update, so videos are frequently problematic for me.
ReplyDeleteHelpful with a capital THANK YOU!!!
ReplyDeleteGreat post! Thanks for sharing.
ReplyDeleteHave a great week. :)
God bless and keep you,
Sonia
I don't have a long arm machine but I still found your tutorial helpful. I think your work is amazing!
ReplyDeleteYes, very helpful and breaks it down a way I wouldn't have naturally tried, and I didn't mind pics over video at all. Thanks!
ReplyDeleteI love to see these tips and tricks! Thanks so much for taking the time to share!
ReplyDeleteAbsolutely phenominal! I feel like I snuck a peek into the life of a celebrity! :) That was very helpful. Thank you so much for breaking it down for us. I still think you create magic on your quilts, but this helps me to see some of the process. Thank you for taking the time to walk us through this design.
ReplyDeleteThanks...that was helpful. I would have loved a video - mostly just to see how you control the ruler and the machine at the same time - but the pictures were very clear.
ReplyDeleteI really like the step by step photos. Sometimes I find it hard to keep up with videos. This made perfect sense to me. Now all I have to do is build my house and get a long arm. :-)
ReplyDeleteWow! What a gorgeous quilt! Your tutorials are always great, Judi! thanks! What kind of ruler are you using? The ruler that I have for my longarm looks much wider and it's a little hard to hold onto because it's too wide for my hands. Oh, and I like the pics! I wouldn't complain about videos, either! Can't wait to see the finished quilt!
ReplyDeleteVery helpful tutorial! The step by step photos are great. It's a technique that I would try. Thank you for sharing.
ReplyDeleteWhen I first saw this on your quilts I was really WOWED!! Thanks for sharing. I appreciate the tutorial.
ReplyDeleteokay - i've not learned much about how to use a longarm (i just use my sewing machine) and i had NO IDEA that people used rulers. you don't know how good that makes me feel - i thought my freemotion straight lines were completely inadequate compared to others, and then i see a ruler in the picture.
ReplyDeletei think that in general, the blogging world doesn't talk nearly enough about quilting. there's so many patterns for the quilt itself, fabric decisions - but nobody really talks about quilting designs. i LOVE to hear about quilting designs...
Thank you Judi! I usually look at a blank space and cannot figure out how to fill it. This helps give me another option!
ReplyDeleteThanks! That is really helpful, I never thought of using a ruler. I'd love to see more posts like this.
ReplyDeleteWhat great tips. So can you only go one direction (left to right) normally with a long arm? I had no idea :)
ReplyDeleteThank you for sharing. I get it! Photos, words, just great. Interesting comment about the left right thing. Today I was quilting and my thread kept shreading on a right to left move.
ReplyDeleteHmmmmmmmmm something to ponder
Cheers
Linda
Taupo
NewZealand
Loved the post, very helpful...sometime videos are problems for some slow computers, so the pics are much better.
ReplyDeleteThis was hugely helpful.....and I especially liked it in photo format....sometimes a video is too hard to see all the detail.....your pics showed it perfectly! Thanks!
ReplyDeleteThank you share more please....
ReplyDeleteVery helpful, thank you so much for the tutorial. I liked the video tutorial as well and learned a lot from both. Please keep posting these great lessons.
ReplyDeleteFantastic, very informative, more, more, more :)
ReplyDeleteThank you so much for this, I love to look at your quilting! I am very new to FMQ so any advice is always helpful. Linda
ReplyDeleteLove the tutorial. It helps to have you break it down the way you do so it's easy to understand. I actually like the pictures more than video in this instance as I don't really need to see you moving the machine but rather how you process through the design work.
ReplyDeleteI would also like to see you you fill other areas such as the area right above the sashing. I really like seeing your process.
Thanks again for taking the time. Your blog is on my google home page! In fact if you ever offered classes I would be right there!
LauraT
That's fantastic, thank you so much for sharing that, I find little tutorials like that so much easier to follow than a video!!
ReplyDeleteYou know I am a professional quilter but I use a domestic machine, so I would use a walking foot for the straight lines.I never would have thought to mark straight lines, I would have marked the diamond shapes, but then I have never done this design. I like it and would like to try it sometime, if a suitable quilt came my way...that is if you didn't mind?
ReplyDeleteAs for the tutorial, I liked it, very clear instructions, clear photo's...but given the choice a video would be great. That's just my ole brain and how it works best...to 'see' it happen. just my 2cents worth!
Thank you for taking the time out from your busy life to show us.
Thank you Judi. This is a great tutorial and I love the step by step photos-in fact for me better than a video. Thank you for sharing and I will be trying this on the next suitable quilt.
ReplyDeleteGreat tutorial, thanks!!
ReplyDeleteand I love photos over video. I can reread the description a few times and refer to the picture without having to go back over the video.
Some things need a video I guess... like 'how to do freemotion quilting in general' but this didn't really need it.
Helpful - fantastic - inspiring!!! Photos are great. Thanks
ReplyDeletePerfectly EXPLAINED.... I like both ways but this has much more explination .... YOU ARE THE BEST THANKS!
ReplyDeleteVery helpful, Thanks!!!
ReplyDeleteWonderful tutorial! I love how you are willing to share your tips and ideas and aren't intimidated by doing so! We have something in common my machine gets picky too going right to left with straight lines, she has her good and bad days. I'm always so impressed with your talent thank you!
ReplyDeleteNow why didnt I think of that! I've been quilting for a very LONG time, and am always happy to learn new tricks. Thanks for sharing, and keep 'em coming. Your work is beautiful!
ReplyDeleteWonderfully helpful. I am saving up for a mid-arm machine and it it fun to learn somethings to try once I get it.
ReplyDeleteYes, I did "know" this, but would not have "thought" of doing this without your little tute. Thank you for being so generous in sharing your ideas and techniques, it's very helpful!
ReplyDeleteWell, since I know next to nothing about quilting on a long arm, this was informative to me. And I MUCH prefer pics/words to video. It looks lovely too!
ReplyDeleteI don't have a long arm either, but I love to check yours and a couple other long armer blogs for ideas to use. I am working on improving my quilting on my domestic sewing machine and I don't get very many ideas myself, so I have to copy other peoples'. Thanks so much.
ReplyDeleteThank you, Judi. I have done this before but it was comforting to know that my machine is not the only one that shreds thread when going right to left doing straight lines! :)
ReplyDeleteCurious to know at what point you remove the blue marker...right after you are done quilting an area or when you are finished with the entire quilt. Do you spritz or immerse the entire quilt in water and let it dry?
Great tutorial. Thanks for sharing, your very generous.
Great post! Thanks so much for sharing it! It was very helpful to see (and I prefer pictures over videos since I read blogs at work and don't turn on sound). I just always thought you eyeballed it all. :-)
ReplyDeleteMore tutorials, please!
Thank you so much, Judi! You are so generous to share your ideas and methods. I look forward to your posts and devour pics of your quilting. I have an A-1, too. You've helped me more than you'll ever know from the stand and stare and hope the light turns on!
ReplyDeletegreat tutorial! I love to see how others quilters quilt.
ReplyDeleteOutstanding! A video would be nice, but I understand your explanations. Just wondering how you remove the purple marker?
ReplyDeleteThe diamonds are beautiful and I foudn the tutorial VERY helpful! Thanks a million!
ReplyDeleteThank you so much for this. I have always wondered how it is done. I am very new to sewing and love looking at your quilting but wondered how you did it. This is great. Someone else commented on how there is little out there on how to actually do the quilting and I agree. This is my most feared thing to do. But now after reading this...feeling a little bet less nervous about my next quilt
ReplyDeleteNice tutorial...I typically like video better, but you could get everything from this one, so it is great too. It looks like you ditched before you did the diamonds? Do you ditch each part before filling in on all custom quilts or do you ditch the whole quilt and come back to fill in? Do you always stitch in the ditch or are there times that you don't? Thanks!
ReplyDeleteI have a midarm setup and occasionally have had thread shredding problems that have magically gone away. I did notice that direction seemed to have an effect but I cannot understand why that should be. And then, without changing thread, needle or anything, the problem's gone. Thanks for sharing. You've made me interested in trying FMQ. Mine is a panto setup as I don't have a direct line of sight to the needle but maybe I can rig something up. Thanks for making your works of art seem possible to do.
ReplyDeleteThank you Thank you! You inspire me to try new things that normally I would not try. I never thought of using hte ruler as I quilt, only to mark lines.
ReplyDeleteThanks for showing your quilting tips. This will be very helpful.
ReplyDeletePLEASE PLEASE PLEASE do more posts like this. This was so very helpful. Video would be great too, but the pictures are fine as well.
ReplyDeleteFirstly, I LOVE just LOOKING at the close-ups. I do a lot of free-form quilting on my DSM, but glean great inspiration from your projects. It helps to know how much detail must be done to get the perfect results - it's not just accidental that your work is precise. Thank you so much for this close up view of your work, and detailed instruction.
ReplyDeleteYour posts are never wasteful. This was very helpful!
ReplyDeleteLove it, Judi! I have an A-1, too! Just did a quilt with rulers and cross hatching. I do have a hard time going from right to left. I thought it was a timing issue?
ReplyDeleteJude
PS love love love your blog! You are my quilting idol!
Pictures okay! Videos often means problems with the link and bad quality. Thanks for your many pictures - loves them!
ReplyDeleteThank you Judi very good how you explained step by step the way you do love its but the video will be very nices to hear you and fill like in the room with you. Love your last brown quilt you did on quilting very nice jobs. Keep up a good work love to see more.
ReplyDeleteI have a longarm, but I only quilt for myself so it is wonderful getting such a GREAT tutorial! I love seeing the pictures and you explaining the process. Pictures are better than a video. Thanks so much for taking the time for showing how you did the design.
ReplyDeleteThank you so much for posting this! I love your youtube videos and this post is great! I am going to try this on my next quilt. I really appreciate you taking time to post these helpful tutorials.
ReplyDeleteI generally hand quilt but this technique will work really well for that, too. I'm glad you posted it because I'm just about to start on a border with diamonds. Thanks - it was perfect timing!
ReplyDeleteThis is great. I am just starting to get the hang of long arm quilting and I am eating up everything I can get my hands on. Love the pictures, in fact I want to try this on 2 quilts I am working on now. I have a question..maybe a stupid question...do you mark each section of a quilt when it is on the frame or do you mark the quilt before it goes on the frame. One more question where did you buy your ruler? Thank you for any info you have to offer.
ReplyDeletegreat answer to my earlier question about marking straight lines although i do love a good video to watch i can sit and watch you quilt for hours i showed my husband last night and he also was impressed thanks again!!!
ReplyDeleteanother question if you were to have to buy another longarm would you stick or try another brand just curious there are so many
I enjoyed it, eventhough I don't have a LA machine. BTW, I showed MR your post about not putting so much quilting in the quilt and then I showed him the Civil War quilt you quilted. We were so amazed at the skill and time it took to do it. Amazing! Thanks again for sharing :o)
ReplyDeleteThank you so much for your tutorial - I'm going to try applying this when I trying machine quilting. I prefer the step by step tutorial over a video so that I can take my time and review each step. I find with videos, I have to pause it so much that I don't enjoy it.
ReplyDeleteLove this! Thank you so much. I love when you post vidoes too. This is definitely something I love to know/learn/study/read! You're the best :)
ReplyDeleteThanks for the good tutorial. I am very new to machine quilting and wonder if this would work on a domestic machine (husq Topaz 020). My dialup internet doesn't support video (too slow) so the tut as is was great!
ReplyDeleteI love your blog and all your tutorial. Photo are find, but I also like video.
ReplyDeleteLucie
thank you for the tutorial....I really liked it...being a beginner quilter, I am happy to learn everything that I can...I like the photos and I also like videos...
ReplyDeleteI LOVED it, thanks!
ReplyDeleteOh, cool! Now I've learned something new and usable. Thanks!
ReplyDeleteok now about the plume in the previous post it doesnt apear that you retraced any lines do you do alot of stops and starts
ReplyDeleteYou are so generous to share this with us, the pictures are great. Thank you Judi, I love your blog.
ReplyDeleteI enjoy following your blog, it is such a treat to see the quilting you do. I'm a new longarm quilter and appricate your taking the time to share your talent with us.
ReplyDeleteIncredibly helpful. Thanks so much for sharing. Will attempt to quilt with this pattern.
ReplyDeleteYour designs are just beautiful... and I very much appreciate your willingness to share how you created parts of them...
ReplyDeleteLove the instructions. Thank you-appreciate your showing everyone how to make quilt designs! Love your work.
ReplyDeleteThank you, Judi. That was very helpful. Looking forward to seeing more tutorials.
ReplyDeleteThank you, Judi. I agree with what someone else said that there aren't many things online that show basic techniques. We see a lot of really fancy stuff, computerized, etc. but not things like this and how about how in the world does one do SID so accurately??
ReplyDeleteI could just kiss you! A RULER! Of course one would use a ruler for straight lines!! Gosh do I feel like a moron now...
ReplyDeleteI've felt like I'll never ever dare to try and do straight lines FMQ (because let's face it, all my tests look like someone drunk did them) and all of a sudden this post appears and I see so many possibilities! Since I don't have a longarm I of course had to jump to my machine and see if it worked when quilting on a home machine too and it did, perfectly! Please, pretty please do more of these quilting tutorials, I'm only just started free motion quilting this year and there's so much I want to learn, and to get to learn from you, that's nothing sort of amazing!
Wow I feel like I got my Christmas gift. Please feel free to assume I don't know anything and am greatly benefiting from your amazing work. Thanks
ReplyDeleteThe close up pictures and excellent narrative does much more than a video in my opinion. This benefits those who do LA or DSM and I certainly hope that you continue to do more of these tutorials in the future. I do have one question, do you tie off your threads or stitch stationary to secure them?
ReplyDeleteThank you for giving us more eye candy to view!
Laura from Montana
Yes thanks! I'm a brand new longarmer so I soak up simple & basic info!
ReplyDeleteI didn't know any of this, so thank you for instructing us. The still pictures do very well in my opinion. Thank you so much for taking the time to post. Oh and your little boy is the cutest!!!!
ReplyDeleteThank you! I am a new long am quilter and appreciate any tips I can get. This will be very useful.
ReplyDeleteThanks for sharing. I love the photo tutorial. I am a new long arm quilter (had my machine just over a week) so this was very helpful. I have "played" with the rulers I got, but I like that short one...
ReplyDeleteVery very helpful. Thank you for sharing and the time it took you to do so!
ReplyDeleteYour work is so fantastic! This has to be the best tutorial for machine quilting that I have ever seen and I have seen a lot. LOVE, love love the photos over the videos! The videos are always fascinating to watch but they do very little in the "learning" arena. I loved that I could read, study the photos, read again etc. No one else ever teaches us the thought process behind the way they do things. Just watching them do it and never knowing why is just not helpful in my opinion. Thanks every so much for sharing!! Rose L from the QB
ReplyDeleteThis was so interesting! I really liked the photos as I have problems with videos. I don't have a longarm but can't wait to try something like this on my domestic. SewCal Gal had a link to this. Thanks!
ReplyDeleteExtremely helpful, thank you! For me, particularly the information about going right to left and left to right.
ReplyDeleteJudi, thanks for a great tutorial. I really appreciate you giving your time and sharing with us.
ReplyDeleteI like both tutorial formats. The thing I love about the videos is being able to see you quilt.
This was extremely helpful. I would have loved the video. What if the sashing had been 13 1/2 inches?
ReplyDeleteVery helpful-thank you!! I will be working on my diamonds tomorrow :-)
ReplyDeleteTruly very helpful. Your pics and explanation are very clear. Thanks
ReplyDeleteHow am I just now finding this tutorial? I LOVE it! For me, the pictures with text are easier to follow because I can refer back to them step-by-step when I'm at my machine and ready to try it. Which is why I love your BOOK so much! :-) I know a lot of people enjoy learning from videos and DVDs, but for me, I just can't keep all the details in my short term memory from a video. I need something in writing that I can refer to when I'm scratching my head thinking, "Now, HOW far apart were those lines? Which side did she say to start on?" Otherwise I would be playing the video again and again, scrambling to scribble down everything you said in a notebook.
ReplyDelete